Using Entity Framework Code First to map POCO classes to the database
In the previous post, I talked about how to work with Entity Framework using the Designer, a class model created from an EDMX file. This model works perfectly in different types of projects, but the big drawback is having an EDMX file for each database in your project.
So let's now take a different approach, but not that different from the previous article. Our need is still to maintain the isolation of the database and to work only with objects. Code First, as its name suggests, leads us to create the POCO classes first and then the database after, but it is also possible to take an existing database and generate the Code First.
The Entity Framework bridges the gap between the POCO classes and the database using a container that we call Context. The context is responsible for mapping our classes with the database and also for informing the engine which the database is, through the connection string, and this is what I like most about Code First, you need to change only the connection string for switching database. No other code changes are required.
Installing Entity Framework Code First:
Before we start writing the classes, we need to install the Entity Framework Code First, which is basically included in the EntityFramework.dll. We will do this with NuGet, which is a package installer for Visual Studio. If you don't already have it, go to the Visual Studio Extension Manager (Tools -> Extension Manager) and install:
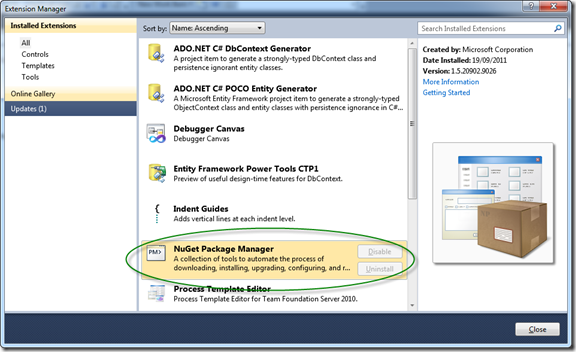
After NuGet is installed, go to Tools -> Library Package Manager -> Package Manager Console. This will open the NuGet manager:

Now type the command: Install-Package EntityFramework inside the console, this will install EF Code First and its dependencies.
Creating a project with EntityFramework Code First
We will create a context class that we will call Context.cs, this class will inherit from DbContext, and in it, we will map our tables:
using System;
using System.Collections.Generic;
using System.Linq;
using System.Text;
using System.Data.Entity;

namespace EFCodeFirst
{
    public class Context : DbContext
    {
        public DbSet<Group> Group { get; set; }
        public DbSet<Product> Products { get; set; }
    }
}
The secret here is DbSet<>, as it maps our class to the database and links it to an object, which we will use to perform the operations with the DB.
See the code for the Group class:
using System;
using System.Collections.Generic;
using System.Linq;
using System.Text;
using System.ComponentModel.DataAnnotations;

namespace EFCodeFirst
{
    [Table("Group")]
    public class Group
    {
        public int ID { get; set; }

        [Required(ErrorMessage="Name cannot be empty.")]
        public string Name { get; set; }

        public virtual IQueryable<Product> Products { get; set; }
    }
}
Product class:
using System;
using System.Collections.Generic;
using System.Linq;
using System.Text;
using System.ComponentModel.DataAnnotations;

namespace EFCodeFirst
{
    [Table("Product")]
    public class Product
    {
        public int ID { get; set; }

        [Required(ErrorMessage="Description cannot be empty.")]
        public string Description { get; set; }

        public int GroupID { get; set; }

        [ForeignKey("GroupID")]
        public virtual Group Group { get; set; }
    }
}
In Code First, we can control all aspects of class mapping with the database, from the name of the table in the database, mandatory fields, size, etc.
In the Group class, I determined the name of the table in the database (line 9). We can have a name for the classes and another for the table in the database. I also informed you that the name could not be empty and linked a message, which can be used in MVC and WPF projects (line 14). Finally, I created the relationship between Group and Product (line 17).
In the Product class, I also determined the name of the table in the database and the required field. I also made the relationship with the group table through the GroupID property.
EF also automatically identifies the primary keys of the tables, as long as you call them by ID or table_nameID, for example, GroupID or ProductID.
A very nice thing that EF Code First does for us is to create the database, but this depends on the provider of your database, not all providers support the creation of the database.
Now let's set up an example to load data into our database:
using System;
using System.Collections.Generic;
using System.Linq;
using System.Text;

namespace EFCodeFirst
{
    class Program
    {
        static  void Main (string [] args)
        {
            var db = new Context();

            db.Database.CreateIfNotExists();

            var g1 = new Group() { Name = "Pieces" };
            var g2 = new Group() { Name = "Services" };

            db.Groups.Add(g1);
            db.Groups.Add(g2);

            var p1 = new Product() { Description = "Tire", Group = g1};
            var p2 = new Product() { Description = "Wheel", Group = g1};
            var p3 = new Product() { Description = "Alignment", Group = g2};
            var p4 = new Product() { Description = "Balancing", Group = g2};

            db.Products.Add(p1);
            db.Products.Add(p2);
            db.Products.Add(p3);
            db.Products.Add(p4);

            db.SaveChanges();

            var datas = from p in db.Products
                        select p;

            foreach (var data in datas)
            {
                Console.WriteLine("{0, -30} - {1}" , data.Group.Name, data.Description);
            }
        }
    }
}
The code above creates our database in SQL if it does not exist (line 14). After that, I inserted the data in Group and Product, but notice that I simply linked the objects, without worrying about the primary or foreign keys, because EF solves this for us as long as their mapping is correct.
So at the end of the code, we have the database created and the data inserted. See how the database looked in Management Studio:
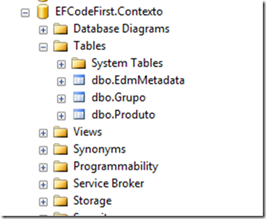
See that the name of the database is the name of the application plus the name of the Context, but we can solve this by adding an App.Config file and informing the database name, so let's add a configuration file to our example and put the following line:
<?xml version = "1.0" encoding = "utf-8" ?>
<configuration>
    <connectionStrings>
        <add name="Context" providerName="System.Data.SqlClient" connectionString="data source=(local);initial catalog=ExampleEF;user id=test;password=test;" />
    </connectionStrings>
</configuration>
The name of the connection string is the same as our Context class. The provider name indicates that we use SQL Server, and the connection string is standard from ADO.Net, informing Server / Database / User. I already made another post talking only about Connection String Management.
Rerunning our code, the database called EFExample will be created and filled with data.
Viewing the CodeFirst model
But what if you want to see how your model is looking if you are using only code? For this, there is the Entity Framework Power Tools that allows viewing the model from the classes and also generating a script for the database. Let's see how to see the visual model of our example.
After installing PowerTools, right-click on the Context.cs class in your project, an EntityFramework context menu will appear, with several options:
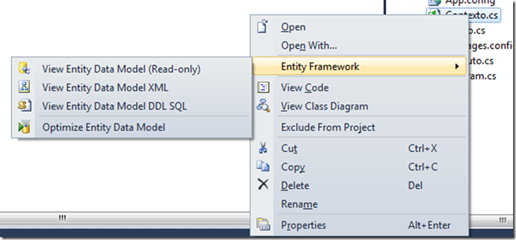
The first option is precisely the one that shows the graphic model, let's see it then:
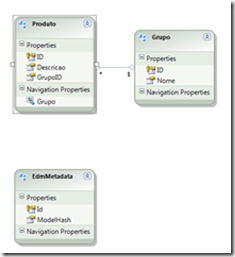
I already have a database, and I want to use Code First
If you already have a database, EF Power Tools allows you to reverse engineer and generate the context and classes, to do this right-click on your Solution in Visual Studio and choose Entity Framework from the menu:
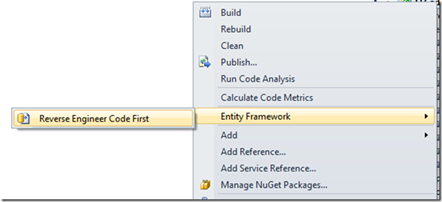
This option generates all classes and relationships of your model, just inform which database and server in the window below.
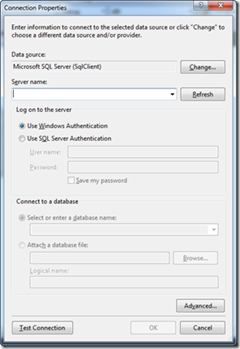
Don't forget to add Entity Framework Code First with NuGet before doing reverse engineering.
When to use Designer or Code First:
That is a very complicated question. I would say that if you use only one database and need to work with Stored Procedures, it is better to use the Designer, mainly because Code First does not yet support procedures natively.
If you want to create an ATM application, in a faster and simpler way through POCO classes, then Code First is your choice.
It is also very important to know that Entity Framework Designer and Code First are independent and may not share some resources.
I hope the article is useful to you.
